HubiC è un'interessante servizio di cloud hosting che ci consente di
avere 25 GB di spazio web gratuito oltre ad altre funzionalità compreso
un client per desktop e device mobili.
Sono molti gli utenti ed aziende che ogni giorno utilizzano servizi si
cloud storage / hosting per poter salvare i propri file in uno spazio
web per poi accederne da più pc device mobili. La maggior parte dei
servizi di cloud hosting consentono anche di poter condividere i file e
soprattutto sincronizzarli su più pc proprio come il nuovo HubiC. HubiC è un servizio di cloud hosting realizzato da OVH, una nota azienda francese, che offre un servizio gratuito con il quale potremo avere 25 GB di spazio online
nel quale possiamo salvare i nostri file preferiti. E' possibile
accedere al nostro spazio web offerto da HuciC direttamente dal nostro
browser oppure attraverso un client dedicato o applicazione mobile.
Il servizio gratuito di cloud hosting offerto da HubiC non include limitazioni,
è possibile anche espandere lo spazio web a 100 GB al mese fino ad
arrivare a 10 TB per 10 Euro al mese prezzi davvero molto competitivi.
Da notare inoltre che HubiC offre a tutti gli utenti (sia free che a
pagamento) una velocità massima in download di 10 Mbit inoltre è possibile inoltre caricare / scaricare file senza limiti di dimensione.
HubiC offre anche la possibilità di sincronizzare file e directory in più pc e device mobili grazie al client ufficiale disponibile per Windows, Mac, Linux e per device mobili Android e Apple iOS.
Il client per Linux è ancora in fase di sviluppo e attualmente richiede
la gestione / configurazione solo da riga di comando a breve comunque
dovrebbe arrivare anche un'interfaccia grafica che ci facilita l'accesso
e configurazioni varie. In questa pagina troverete la guida come installare / configurare il client HubiC per Linux (grazie a Marco Mornati per la segnalazione)
Mozilla ha rilasciato un'interessante classifica dei 13 migliori add.on per Firefox del 2013...
Mozilla Firefox è stato uno dei primi browser al mondo a puntare sulla personalizzazione e l'integrazione di nuove funzionalità tramite add.on di terze parti.
Tramite gli add.on è possibile personalizzare il browser open source
conforme la nostre preferenze integrando anche nuove ed utili
funzionalità che ci consentono ad esempio di condividere news, mantenere
la nostra privacy e molto altro ancora.
Mozilla ha recentemente rilasciato la classifica dei 13 migliori add.on del 2013, tenendo conto sia dei download che lo sviluppo e supporto dei vari add.on.
Ecco quindi i 13 migliori add.on del 2013 scelti da Mozilla:
1- URL Link:
utile estensione per Firefox e Thunderbird che ci consente di
selezionare un url non cliccabile in un messaggio di posta elettronica o
in pagina web e aprirlo in una finestra del browser.
2- Click and Clean:
utile estensione che ci consente di cancellare la cronologia di
navigazione, i file temporanei, cronologia dei download e altro ancora
con un click.
3- Clear Console estensione con la quale è possibile eliminare cronologia, cookie, ecc con un click
4- Self-Destructing Cookies: componente
aggiuntivo che ci consente di eliminare i cookie da qualsiasi sito
automaticamente quando si chiude la finestra o scheda
5- New Tab Plus:
utile add.on con il quale è possibile personalizzare la nuova scheda
inserendo i nostri siti preferiti il tutto attraverso un'utile
interfaccia web HTML5 personalizzabile.
6- Video Resumer: utile
add-on che ci consente di ripristinare la riproduzione di un video da
YouTube dal punto dove eravamo rimasti prima della chiusura.
7- Reload Plus: add-on che aggiunge nuove opzioni al tasto per riavviare la pagina web / scheda
8- Stylish: add-on che consente di installare facilmente temi e skin per Google, Facebook, YouTube, Orkut, e molti altri siti.
9- Fastest Search: utile add-on per velocizzare le ricerche all'interno di una pagina web
10- Google/Yandex Search Link Fix: estensione che impedisce a Google Search di modificare i collegamenti di risultati quando si fa clic su di essi
11- Google Translator: add-on
per tradurre il del testo selezionato, una frase o l'intera pagina Web
in più di 50 lingue attraverso il servizio web Google Translator
12- BluHell Firewall: add-ons per il blocco degli annunci pubblicitari
13- X-notifier: utilissima estensione che ci consente di ricevere notifiche su nuove email da leggere da più account Gmail, Hotmail, Yahoo! ecc.
Per maggiori informazioni potete consultare la classifica direttamente dal blog ufficiale Mozilla.
slowmoVideo è un'ottima applicazione per Linux che ci consente di
creare splendidi video con effetto Slow Motion ossia al rallentatore con
tanti d svariate opzioni.
Per chi non so sapesse la tecnica dello Slow Motion consiste nel
"rallentare" la riproduzione di un movimento alla velocità molto più
lenta del reale. Questa tecnica divenne famosa anche nel cinema con film
ormai diventati veri e propri cult come ad esempio "The Matrix". Per utilizzare l'effetto Slow Motion aziende e professionisti utilizzano costose e avanzate telecamere (denominate "Hight Speed Camera")
in grado di fissare una moltissimi di fotogrammi al secondo in più
rispetto alle "normali" telecamere da 24-30 fps ( fotogrammi per
secondo). Per creare semplici Slow Motion da "normali" video è possibile utilizzare slowmoVideo applicazione open source disponibile anche per Ubuntu e derivate grazie ai PPA dedicati.
slowmoVideo è un programma, disponibile per Linux e Microsoft Windows,
che ci consente di creare video in tecnica Slow Motion partendo da un
"normale" video. Tra le principali caratteristiche di slowmoVideo
troviamo la possibilità non sono di rallentare il video fino a 0.01× ma
anche velocizzarlo 'con tanto di effetto blur (sfocatura) in modo da
renderlo molto più coinvolgente.
Basato su FFMpeg, slowmoVideo supporta i più diffusi formati di video
(anche in alta definizione 1080p) con la possibilità di includere
sequenze di immagini in modo tale da creare il famoso effetto time-lapse.
L'interfaccia grafica di SlowmoVideo ci consente di creare accelerazione
e decelerazioni del video in maniera semplice e molto intuitiva, una
volta creato il nostro video possiamo salvarlo nei più diffusi formati
pronto da essere condiviso con amici o sul web oppure riprodotto su pc,
tv ecc.
slowmoVideo è disponibile per Ubuntu e derivate grazie ai PPA dedicati basta digitare da terminale:
Vi presentiamo due interessanti add.on per Mozilla Firefox grazie ai
quali potremo visualizzare i video in HTML5 senza utilizzare Adobe Flash
Plugin.
Sono ancora molti i siti che utilizzano tecnologie proprietarie per la
riproduzione di contenuti multimediali. Per poter riprodurre contenuti
in Flash siamo attualmente costretti ad utilizzare plugin proprietari
nel nostro browser a meno che non installiamo alternative libere come ad
esempio Lightspark e Gnash oppure il nuovo progetto sviluppato da Mozilla e denominato Shumway.
Google già da diverso tempo ci consente di riprodurre i video da
YouTube in HTML5 in maniera tale da non dover più richiedere l'utilizzo
di alcun plugin di terze parti. E' possibile attivare il video player
HTML5 di YouTube con molta facilità basta collegarci alla pagina dedicata del portale anche se attualmente non sono supportati tutti i video inclusi nel portale. E' possibile riprodurre i video di YouTube in HTML5 in Mozilla Firefox possiamo utilizzare due utili add-on in grado di supportare tutti i video aggiungendo anche utili funzionalità.
YouTube to HTML5 è un'add-on grazie al quale potremo riprodurre i video
con la tecnologia open source senza doverla attivare dalla pagina
dedicata, inoltre ci consente di cancellare i cookie dopo aver chiuso
Firefox, in maniera tale da mantenere la nostra pricacy.
YouTube ALL HTML5 aggiunge utili opzioni al nostro Firefox, è possibile
ad esempio forzare la riproduzione dei video in HTML5, l'add-on inoltre
include utili opzioni che ci consentono ad esempio di modificare le le
dimensioni del player video, è possibile ad esempio disattivare il Flash
solo su YouTube consentendo la riproduzione dei video in Flash sui vari
siti, potremo inoltre disattivare YouTube SPF (funzionalità attiva di
default).
Personalmente vi consiglio YouTube ALL HTML5 dato che include svariate
opzioni oltre a supportare la riproduzione dei video in HTML5 anche dai
siti, blog, forum ecc. Ricordo che i due add.on supportano Firefox per
Linux, Microsoft Windows e Mac OS X.
In questa semplice guida vedremo come attivare Trim nelle nostre SSD con installato Ubuntu Linux o una derivata
Le SSD o Unità a Stato Solido sono presenti ormai in molti nuovi
personal computer, molti utenti utilizzando le SSD per velocizzare il
proprio sistema (visto anche il costo ormai molto abbordabile) incidendo non solo sulle performance ma anche nell'autonomia dei pc portatili.
Tra le novità incluse in Ubuntu 14.04 Trusty LTS troviamo l'attivazione di default di Trim su SSD
grazie al quale gli utenti che utilizzano un'unità a stato solido
noteranno una maggiore velocità di scrittura, oltre ad aumentare la
durata dalla SSD. Supportata dal gran parte delle SSD attualmente
presenti sul mercato, TRIM è un'utile tool che consente al sistema
operativo di dire all'unità quali pagine di memoria non sono più
necessarie, cosi poterle cancellarle (se opportuno).
In questa guida vedremo come attivare Trim su SSD in Ubuntu o una derivata (compreso anche Linux Mint ed elementary OS),
prima di procedere all'attivazione dovremo però verificare che la
nostra unità a stato solido supporti questa funzionalità per farlo basta
digitare da terminale:
sudo fdisk -l
il comando ci darà l'elenco delle partizioni e dei dischi presenti sul
pc, questi ultimi avranno un nome del tipo sdx (ad esempio: sda, sdb,
sdc..), una volta individuato il nome della nostra SSD (esempio sda)
dovremo digitare:
sudo hdparm -I /dev/sdxx
dove al posto di sdxx dovremo inserire il nome della nostra SSD per sda dovremo digitare:
sudo hdparm -I /dev/sda
se supportata dovremo avere come risultato "Data Set Management TRIM supported" come da immagine sotto
Attenzione: Trim supporta solo Ext4 e Btrfs non funziona ad esempio con Ext3 o altro file system
Una volta verificato per abilitare Trim sulla nostra SSD dovremo operare
sul file /etc/fstab per prima cosa ci facciamo un backup del file in
modo tale da poterlo ripristinare in un secondo momento per farlo basta
digitare:
sudo cp /etc/fstab /opt/fstab.back
a questo punto avviamo /etc/fstab con nano digitando:
Il tool isousb sviluppato da Manjaro
Linux grazie al quale potremo estrarre il contenuto di un'immagine ISO
o IMG all'interno di una pendrive.
L'arrivo delle pendrive e memorie flash ha praticamente mandando in
pensione i supporti ottici come cd e dvd a tal punto che gran parte dei
nuovi personal computer non dispone di alcun masterizzatore. Per poter
installare una distribuzione Linux basta quindi aver una pendrive nella
quale dovremo estrarre la nostra immagine .iso o img scaricata in
precedenza, per far questa operazione possiamo utilizzare il terminale Linux con il comando DD
oppure utilizzando svariate applicazione dedicate come ad esempio la
famosa UNetbootin la quale però non supporta alcune distribuzioni tra
queste anche alcune derivate di Arch Linux. A creare un tool in grado di
supportare tutte le distribuzioni ci pensa il team Manjaro Linux con il
nuovo isousb.
isousb è un semplicissimo tools open source che ci consente di estrarre correttamente un'immagine ISO o IMG all'interno di una pendrive rendendola avviabile da boot.
L'idea degli sviluppatori Manjaro è quella di creare una versione per Linux del famoso tool Image Writer o Win32 Disk Imager, sviluppato in Launchpad e disponibile però solo per Microsoft Windows.
Utilizzare isousb è semplicissimo una volta avviato il tool ci verrà
chiesto di scegliere l'immagine ISO o IMG da utilizzare, successivamente
dovremo scegliere la pendrive dalla quale estrarre il file immagine,
una volta terminato il processo avremo la nostra pendrive avviabile
pronta per essere avviata al boot.
L'applicazione automaticamente formatterà la pendrive e rimuoverà
eventuali partizioni in essa contenute velocizzando quindo il processo
di copia dell'immagine ISO.
Possiamo utilizzare isousb di Manjaro in qualsiasi distribuzione basta che sia installato Zenity per verificarlo ad esempio in Ubuntu, Debian e derivate basta digitare:
sudo apt-get install zenity
a questo punto siamo pronti ad "installare" isousb con tanto di collegamento nel menu digitando:
Come installare i driver per stampanti e scanner Samsung grazie ai repository Samsung Unified Linux Driver.
In Ubuntu e nelle principali distribuzioni Linux troviamo di default il
gestore di stampa CUPS (Common UNIX Printing System) con il quale
(attraverso una raccolta di driver open source) potremo configurare la
nostra stampante utilizzando software e driver liberi.
I driver Gutenprint forniscono il supporto per molti modelli di
stampanti prodotte da Brother, Canon, Epson, HP, Kyocera, Lexmark, Ricoh ecc (in questa pagina troverete l'elenco completo delle stampanti supportate)
i quali però per alcune stampanti non forniscono un completo supporto
(esempio con risoluzioni ridotte, colori non corretti ecc). Se abbiamo
una stampante Canon possiamo installare i driver proprietari seguendo questa guida, per le stampanti HP basta installare HP Linux Imaging and Printing (HPLIP) se abbiamo invece una stampante o scanner Samsung possiamo utilizzare i driver inclusi nei repository Samsung Unified Linux Driver.
Samsung Unified Linux Driver sono dei repository in grado di offrire
un completo supporto per stampanti e scanner (sia USB che Wireless) in
Ubuntu, Debian e derivate.
Basta includere i repository ed installare i vari driver per poter far
funzionare correttamente la nostra stampante e scanner Samsung in Linux
(in questa pagina troverete le stampanti supportate).
Essendo driver proprietari avremo il supporto come Microsoft Windows con
il supporto per le varie funzionalità incluse nella stampante (esempio
fronte / retro automatica, pulizia testine ecc).
Per installare i driver per stampanti e scanner Samsung in Ubuntu, Debian e derivate (compreso Linux Mint ed elementary OS) basta digitare da terminale:
sudo nano /etc/apt/sources.list
e aggiungiamo:
deb http://www.bchemnet.com/suldr/ debian extra
e clicchiamo su ctrl+x e poi s per salvare
successivamente inseriamo le key d'autentificazione digitando sempre da terminale:
al termine dell'installazione basta avviare il gestore di stampa o
software per lo scanner e configuriamo la nostra stampante o scanner
Samsung.
Possiamo avviare il tool Unified Driver Configurator dal quale
possiamo gestire la nostra stampante o multifunzione Samsung da una
semplice interfaccia grafica Qt (ben supportata da qualsiasi ambiente
desktop Linux).
Può capitare che il nostro scanner di una multifunzione Samsung non sia riconosciuto, basta digitare da terminale:
sudo usermod -G lp -a USERNAME
dove al posto di USERNAME dovremo inserire il nostro username e riavviamo la nostra distribuzione.
Al riavvio avviamo il terminale e digitiamo:
Dal team francese Voyager arriva la distribuzione basata su Debian 7
Wheezy con incluse tantissime personalizzazioni e ottimizzazioni varie.
Da alcuni anni ormai seguiamo gli sviluppi del progetto Voyager, una distribuzione basata su Xubuntu
che non una semplice derivata con sfondi, tema e tante app dato che
introdotti troviamo moltissimi tool dedicati, conky ed ottimizzazioni
ecc che rendono l'ambiente XFCE davvero incredibile.
Da pochi giorni è disponibile Voyager 7 Debian Wheezy, nuovo
progetto (ancora in fase di sviluppo) che punta a portare tutte le
personalizzazioni ed ottimizzazioni della versione per Xubuntu anche nel
sistema operativo universale.
Voyager 7 Debian Wheezy si basa quindi su XFCE nella versione 4.8
(di default nei repository ufficiali) con LightDM come display manager,
nella distribuzione troviamo però incluso il gestore grafico dei driver che
ci consente di installare facilmente driver proprietari all'interno
della distribuzione. Tra le applicazioni di default troviamo Whisker Menu e la dockbar Plank (di default in elementary OS), presenti anche alcuni tool a riga di comandi come il file manager Ranger, il monitor di sistema Glances e Speedometer per monitorare al nostra connessione.
Tra i tool troviamo anche Conky Control utile software che ci consente di avviare, gestire e personalizzare moltissimi temi conky che possiamo diversificare per ogni spazio di lavoro. In Voyager 7 Debian Wheezy avremo in ogni spazio di lavoro uno sfondo e tema conky dedicato, il tutto con un nuovo tema e set d'icone sviluppato dal team Vojager. Da notare Login Wall che ci consente di aver uno sfondo diverso ad ogni sessione, il tool include anche il supporto per LightDM, tra le applicazioni preinstallate troviamo Iceweasel, Youtube Viewer, Clementine e Covergloobus utile widget completamente personalizzabile che ci consente di alla gestione il player audio, visualizzare la cover ecc.
Voyager 7 Debian Wheezy è un nuovo progetto ancora in fase di sviluppo,
attualmente è disponibile solo nella versione 64 bit, da live ci verrà
chiesto di inserire come username: user e password: live .
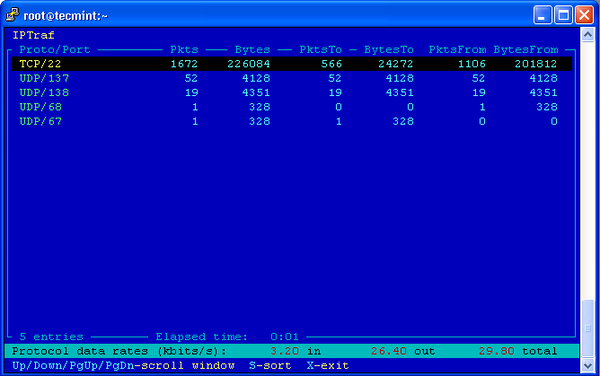
There are number of monitoring tools available. Moreover, i came across a IPTraf monitoring tool which i find very useful and it’s a simple tool to monitor Inbound and Outbound network traffic passing through interface.
Install IPTraf LAN Monitoring
IPTraf is an ncurses-based IP LAN monitoring tool (text-based) wherein we can monitor various connections like TCP, UDP, ICMP, non-IP counts and also Ethernet load information etc.
This article guides you on how to install IPTraf monitoring tool using YUM command.
Installing IPTraf
IPTraf is part of the Linux distribution and can be installed on RHEL, CentOS and Fedora server’s using yum command from terminal.
# yum install iptraf
Under Ubuntu, iptraf can be installed using Ubuntu Software Center or ‘apt-get’ method. For example, use the ‘apt-get‘ command to install it.
$ sudo apt-get install iptraf
IPTraf Usage
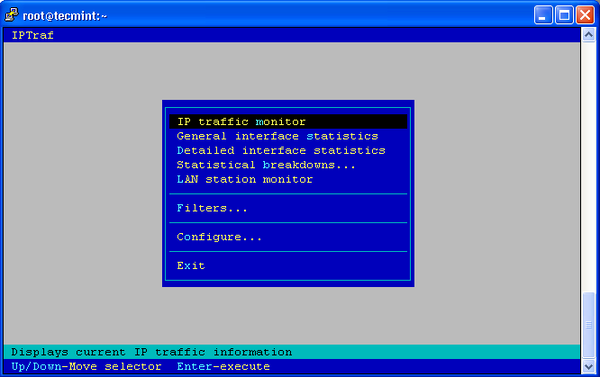
Once IPTraf installed, run the following command
from the terminal to launch an ascii based menu interface that will
allow you to view current IP traffic monitoring, General interface statistics, Detailed interface statistics, Statistical breakdowns, Filters and also provide some configure options where you can configure as per your need.
[root@tecmint ~]# iptraf
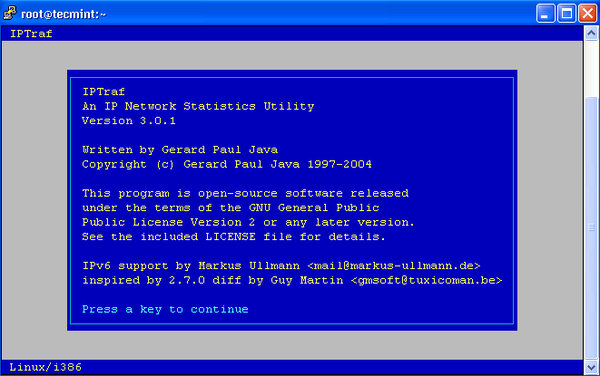
IPTraf Startup Screen
The iptraf interactive screen, displays a menu system with different
options to choose from. Here are the some screenshots that shows real
time IP traffic counts and interface statistics etc.
IPTraf System Menu
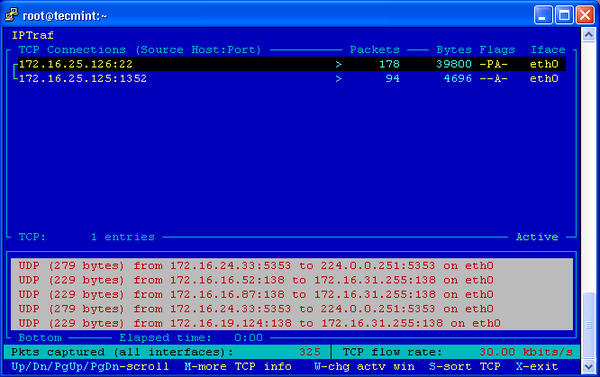
IP traffic monitor
IP Traffic Monitor
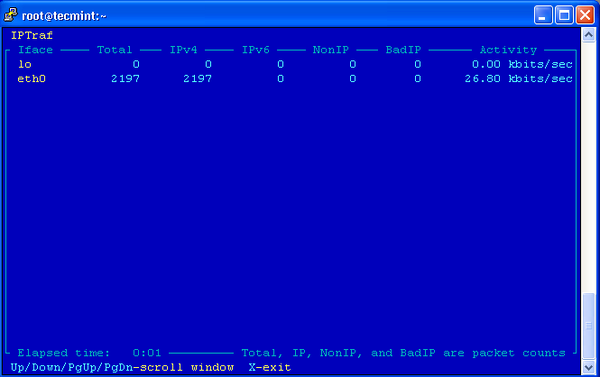
General interface statistics
IPTraf General interface statistics
Detailed interface statistics
IPTraf Detailed interface statistics
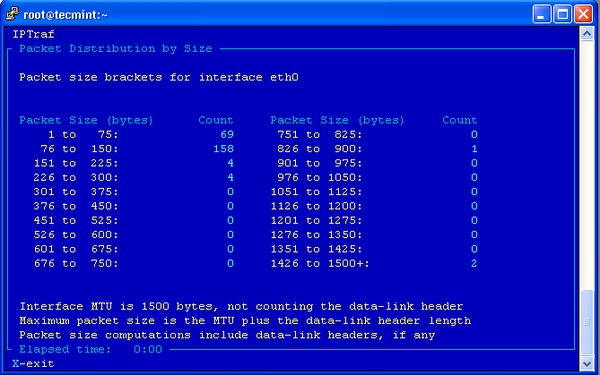
Statistical breakdowns
IPTraf Statistical breakdowns
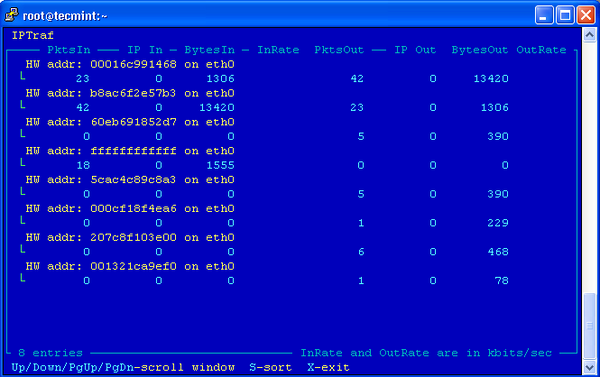
LAN station monitor
IPTraf LAN station monitor
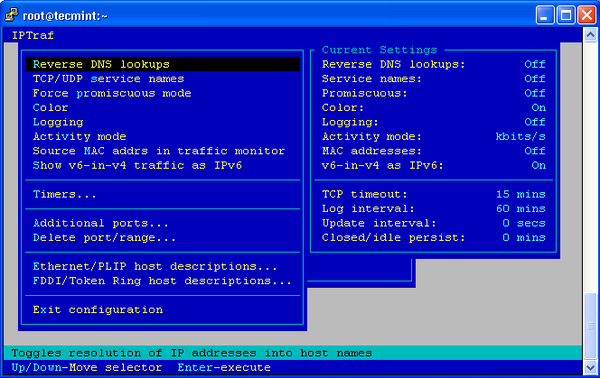
Configure
IPTraf Configure
IPTraf Options
Using “iptraf -i” will immediately start the IP
traffic monitor on a particular interface. For example, the following
command will start the IP traffic on interface eth0.
This is the primary interface card that attached to your system. Else
you can also monitor all your network interface traffic using argument
as “iptraf -i all“.
# iptraf -i eth0
IPTraf Eth0 Monitoring
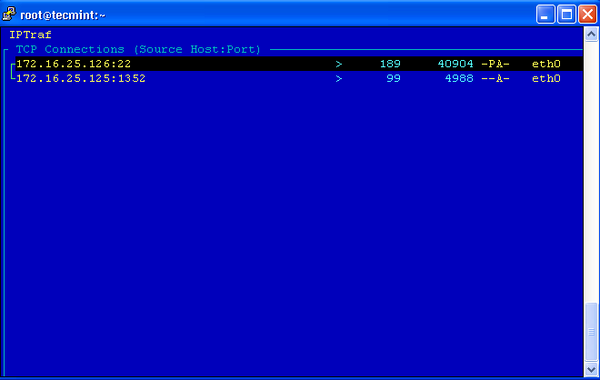
Similarly, you can also monitor TCP/UDP traffic on a specific interface, using the following command.
# iptraf -s eth0
IPTraf TCP/UDP Monitoring
If you want to know more options and how to use them, check iptraf ‘man page‘ or use the command as ‘iptraf -help‘ for more parameters. Fore more information visit the official project page.
Non è
impossibile che tramite un aggiornamento o qualche installazione errata
Ubuntu non si avvii più, ma per fortuna c’è la soluzione e l’unico
requisito è avere il CD live (o chiavetta USB) per avviare una sezione
di prova e riparare l’avvio.
Se non sai come creare un CD/USB live di Ubuntu, puoi leggere la nostra guida
Dunque non resta che avviare la live e procedere nel ripristinare Ubuntu
Ripristino Ubuntu da Live
La prima
cosa da fare è trovare la partizione (sda) in cui è stato installato
Ubuntu. Di solito questa è sda1, ma per esempio in un dualboot con
Windows (dove ovviamente è stato installato per primo quest’ultimo) la
partizione non sarà più sda1. Quindi digitiamo nel terminale
sudo fdisk -l
per capire qual è la partizione ‘/‘, ovvero l’avvio di Ubuntu
Nel mio
caso le partizioni relative a Ubuntu sono sda5 sda6 e sda7, ma qual è
quella di avvio? Escludiamo subito sda6 che, come vediamo chiaramente, è
l’area di swap e verifichiamo le altre due, le quali sono ‘/’ e
‘/home’. Per farlo, dobbiamo montarle e utilizzare il file manager per
trovare la partizione. Diamo quindi da terminale
$ sudo mount PARTIZIONE /mnt
dove PARTZIONE sta per (sempre nel mio caso) sda5 o sda7. Nel terminale dovrà essere inserita interamente, cioè
$ sudo mount /dev/sda5 /mnt
a questo punto apriamo il file manager e rechiamoci nella cartella /mnt e come potete vedere ho montato la partizione /home
provo quindi a montare sda 7, che per esclusione deve essere il root e, difatti, ecco il contenuto della cartella
adesso possiamo procedere col ripristino. Continuo coi comandi, considerando che la vostra partizione è già montata
$ for i in /sys /proc /run /dev; do sudo mount --bind "$i" "/mnt$i"; done
$ sudo cp /etc/resolv.conf /mnt/etc/
$ sudo chroot /mnt
$ apt-get update
$ apt-get upgrade
Dopo
questo procedimento, il sistema funzionerà di nuovo. Se però il problema
è stato causato dai repository proposti (quelli per sviluppatori,
sconsigliati per l’uso giornaliero normale di Ubuntu) è necessario
effettuare il downgrade dei pacchetti, in questo caso leggi la guida al downgrade dei pacchetti ad una versione stabile.
Adding a solid-state drive (SSD) to your computer is simply the best upgrade at your disposal,
capable of speeding up your computer in ways you hadn't thought
possible. But as with any new technology, there's plenty to learn.
Here's everything you should know about your SSD, whether you're
interested in upgrading or just like to know the ins and outs of your
hardware.
Blast from the past
is a new weekly feature at Lifehacker, in which we revive old, but
still relevant, posts for your reading and hacking pleasure. This week,
we're updating our complete guide to solid-state drives, making it
easier than ever to find everything you need to know about the best
upgrade you can make.
What Is a Solid-State Drive (SSD)?
Expand
A
solid-state drive (SSD) is a data storage device for your computer. In
everyday use, it provides the same functionality as a traditional hard
disk drive (HDD)—the standard for computer storage for many years. In
fact, you wouldn't even know whether you're using an SSD or HDD if it
wasn't for the differences in how they operate. HDDs store their data on
spinning metal platters, and whenever your computer wants to access
some of that data a little needle-like component (called the "head")
moves to the data's position and provides it to the computer. Writing
data to a HDD works in a similar fashion, where parts are constantly
moving. SSDs, on the other hand, don't move at all. They store their
data in blocks. When the computer wants some of that data, the SSD just
says "okay, here it is." This is a simplified explanation, of course,
but you might have noticed that the SSD's process seems a bit more
direct and efficient. It is, and speed is the primary advantage of an
SSD over a traditional HDD. This makes an SSD the single best upgrade
for your computer if you're looking for a way to make it operate faster.
A new SSD can speed up your computer in several ways:
Boot times will be significantly reduced.
Launching applications will occur in a near-instant.
Saving and opening documents won't lag.
File copying and duplication speeds will improve.
Overall, your system will feel much snappier.
SSDs have
their downsides, however. For starters, an SSD won't hold as much data
per dollar as an HDD. For the same $100, you could buy either a 120GB
SSD or a 2TB HDD. That means you're paying around 83 cents for every
gigabyte on an SSD versus five cents for every gigabyte on your HDD.
That's a huge difference in cost, and the gap only grows as you compare
larger drives. Luckily, it's not an all or nothing proposition. In the
days of cloud storage and streaming media, SSDs provide plenty of space
for most people. For those who need more storage than is affordable with
an SSD, SSDs and HDDs can coexist on the same system (and we'll discuss
those in depth a bit later), so you can enjoy the speed benefits of an
SSD without sacrificing on storage.
In this
post, we're going to walk you through everything you need to know about
getting started with your first solid-state drive, from buying the one
that suits you best to getting it set up and running most efficiently in
your computer. We'll even take a look at a few advanced techniques for
those of you who are ready to do even more with your super-fast storage
device.
How to Choose the Right SSD
Choosing
the right solid-state drive for you isn't difficult, but the process can
be a little overwhelming with so many brands available. In this
section, we'll show you what you want to look for when choosing a drive
and offer up a few recommendations that have worked well for us.
All SSDs
are fast, and will feel like a great upgrade from a HDD, but when you're
spending significantly more money on a drive that provides less storage
you want it to be one of the best. You also want a reliably piece of
hardware, and these are both fairly hard to gauge if you have little
experience with the technology. Here are the qualities you want to look
for in an SSD when you're shopping around:
Expand
High maximum speeds: Max read speeds are around 400MB/second, and max write speeds are around 300MB/sec (note: that's megabytes per second). These numbers do not have to be exact. A little faster or slower won't make a significant difference.
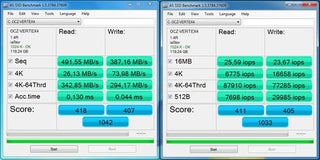
Good real-world speeds:
The SSD manufacturers generally will not provide real-world read and
write speeds, as they're guaranteed to be slower than the maximums.
Fortunately, many online reviews contain speed test results. On Amazon, you can often find users who've posted screenshots of their test results (here's an example).
Seeing this data can often be discouraging because the real-world rates
are quite a bit lower. If the test results reveal read and write speeds
of about 2/3 of the maximum (in the sequential and 512KB block tests)
you're good to go. If you apply this to our maximum speeds above, that
comes out to read speeds of about 265MB/sec and write speeds of about
200MB/sec. If you want to figure out if a more expensive SSD is worth
the money, its real-world test speeds will be higher than 2/3 of its
reported maximum capabilities.
Multi-Level Cell (MLC) NAND flash memory:
When shopping for SSDs, you'll run into two kind of memory: multi-level
cell (MLC) and single-level cell (SLC). The primary difference is that
MLC memory can store more information on each cell. The advantage here
is that it is cheaper to produce, and SLC is often cost-prohibitive for
the average consumer. The downside is a higher rate of error, but an SSD
with error-correcting code (we'll discuss this momentarily) can help
prevent these problems. (You can read more about MLC here.)
SATA III Support:
Most SSDs use the Serial ATA (SATA) interface, but not all use the
latest version and this can limit the performance of your SSD. This is
because SATA I can transfer data at 1.5 Gbps, SATA II at 3.0 Gbps, and
SATA III at 6 Gbps. To ensure your SSD has enough bandwidth to transfer
data as quickly as possible, you want it to be compatible with SATA III.
You'll also want to make sure your computer is SATA III compatible as
well. If not, SATA III-capable drives will still work as all versions of
SATA are backwards-compatible. Just know that you may not get the most
out of your SSD if your computer doesn't support the most recent SATA
specification.
ECC memory:
Error-correcting code (ECC) memory does what the name implies: it
provides your SSD with the ability to detect and correct common types of
data corruption so you don't end up with unusable data on your drive.
An SSD with ECC memory is more reliable. (You can read more about ECC
memory here.)
A history of reliability:
Reliability is a very hard thing to gauge, but there are a few tricks
you can employ to get a good idea. First, look for an SSD that is made
by a manufacturer who has been in the business for a while (I like OCZ
and Crucial). The technology is fairly new, so you don't want to go with
just any company who has recently decided to jump on the solid-state
bandwagon. Additionally, look at the rating each SSD receives in online
shopping reviews. If it is rated a 3.5 out of 5.0 or higher, this is
often points to a reliable drive. When the ratings are lower, you may
want to look elsewhere. Even reliable companies make unreliable SSDs
sometimes, so keep an eye on reviews to avoid buying a lemon.
Which SSDs meet these criteria? This changes over time, so we're going to defer to our friends at the Wirecutter,
who will keep their SSD buying guide up to date as things change. It's
not an end-all-be-all suggestion, so if you want to shop around and
weigh your options, keeping the criteria mentioned in this section in
mind will help you find a good, reliable drive.
How to Install Your SSD
Installing
your SSD will be different depending on your computer, so we highly
recommend looking up a guide for your specific model of laptop or
desktop. That said, if you have a desktop, our guide on building a computer should at least steer you in the right direction.
More
important is figuring out where all your data will go. Most HDD owners
are accustomed to having at least 500GB of storage, if not upwards of
2TB. Downsizing to 120GB or 240GB—the most affordable and popular SSD
sizes—can be a tough job. If you're using a desktop, you can use your
SSD for your operating system and another hard drive for your data. If
you're using a laptop, you can either try to fit everything on the SSD,
or use an external drive for the data that won't fit (like music and
movies).
Once you've figured out a plan, it's time to actually switch to the SSD. Here are your two options for doing so:
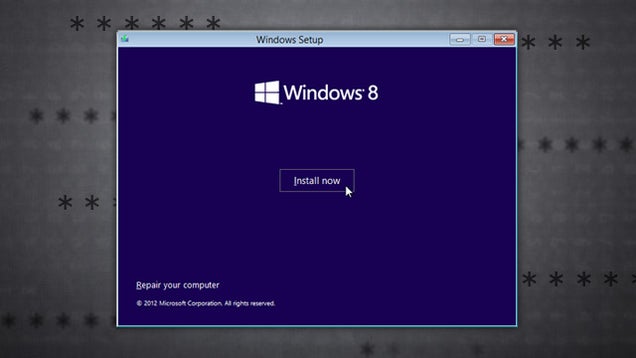
Option One: Start Fresh and Copy the Essentials
Expand
When
upgrading to an SSD, the most obvious option is starting fresh with a
new install of your operating system. While this might require a little
more of your time, you'll have everything configured perfectly when
you're done. Here are the steps you need to follow:
Install your operating system of choice on the new SSD.
Copy the
contents of your home folder from your previous HDD to your new SSD. If
you can't fit everything, start with the essential system files and
settings, then migrate the media you have room for.
Go
through the list of applications on your old HDD and install them on
your new SSD. Run any updates, or save yourself some time by downloading
the latest versions from their respective sources. Windows and Linux
users can employ Ninite
to get the latest versions of popular free software titles for their
machines. OS X users can head to the Mac App Store to download the
latest versions of their previous purchases.
Copy any important documents (or other files) you have room for on your SSD.
Put the old HDD in an external enclosure (like these),
if you haven't already, and keep it handy for a month or two. This will
help you see what files you use often and which ones you don't. If you
find you're using something often, copy it to the SSD. If not, leave it
on the external HDD for occasional access.
Again, this
method requires more work but also handles the task of cleaning up your
system at the same time. It may be more tedious, but it is an efficient
way to solve two problems at once.
Option Two: Migrate Your Data from Your Old Hard Drive
Expand
If you
don't want to start with a fresh installation of your operating system,
you can always migrate your OS (and other data) to your new SSD. Chances
are, however, that you're not going to be able to fit everything. That
means you're going to have to start deleting files on your main drive
until it is small enough to fit on your SSD. Because you don't want to
lose that data forever, start by making a backup of your drive. Once you
have a complete backup, you're ready to get started.
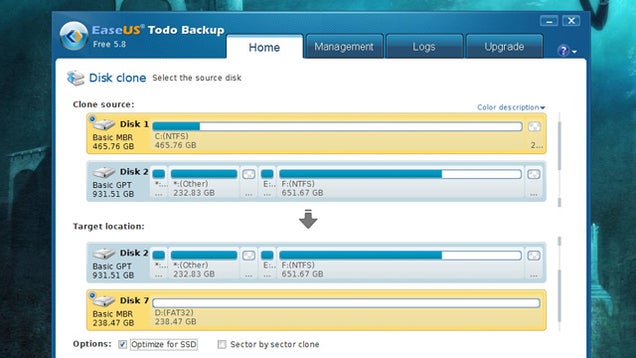
Windows users can follow our SSD migration guide
for the complete instructions. It comes across as a complex process,
but shouldn't take too much time. You also won't have to reinstall
Windows. Mac users can follow our MacBook SSD installation guide.
While the guide focuses on installing an SSD in a MacBook Pro's optical
disc drive bay, if you skip to the second half you'll find instructions
on performing a data migration as well.
If You Don't Have a Second Hard Drive: Use an External Drive and the Cloud to Combat Storage Constraints
Expand
Regardless
of the size of your SSD, it's never going to beat the storage capacity
of a HDD. If you don't have a secondary hard drive installed in your
computer, you're going to need to store your excess data elsewhere. An
external HDD and the cloud are two of the best ways to get around the
storage limitations of your SSD.
Unless you
have enormous collections, an SSD with a 240GB (or higher) capacity
should be able house your operating system, documents, music, and photos
without issue. It's when you get into the business of music creation,
video editing, professional photography, and other work that produces
large files will you regularly run into a storage ceiling. An external
drive is often the easiest solution, so you'll want to pick up one with a
large-enough capacity to suit your needs. If you're looking for a
portable drive, the Seagate GoFlex series
is worth a look as it not only works with USB 3.0, but can be connected
to other ports like Firewire 800 and Thunderbolt by way of adapter.
This also provides you with some assurance of compatibility with future
technology.
When an
external drive won't do the trick, and you really need to downsize your
space-hungry media collection, the cloud can come to the rescue. Most of
the best solutions come from Google because they're both simple and
free. Google Play Music
allows you to upload your entire audio collection, and doing so will
allow you to delete any songs you rarely listen to (or at least move
them to an archival hard drive) while still maintaining direct access to
them from anywhere you have an internet connection. Picasa can do the same thing for your photos. (Personally, I prefer Flickr, but it isn't free.) When it comes to other data, you have plenty of options. Google Drive is great for various files, Simplenote for text, and Evernote
for rich text and PDFs. It doesn't matter so much which services you
use, but rather that you start making regular use of the cloud if you
have heavy data needs that can't be adequately served by an external or
secondary internal drive.
Optimize Your SSD for Optimal Performance
For the
most part, there isn't much you have to do to optimize your SSD. It's
already really fast and should do it's job without any adjustment. That
said, you can achieve better performance and longevity with a few
adjustments.
Enable TRIM
Expand
The very first thing you should do after installing and setting up your SSD is enable TRIM. What is TRIM, exactly? Wikipedia offers a concise explanation:
TRIM is a
command [that] allows an operating system to inform a solid-state drive
(SSD) which blocks of data are no longer considered in use and can be
wiped internally.
Basically,
it prevents your SSD from being overused. Just like any component, SSDs
have limited lifespans. TRIM helps keep your solid-state disk alive a
bit longer, so you want to have it enabled if your drive supports it.
Here are instructions on how to find out and enable TRIM in Windows and OS X.
Don't Defragment Your SSD
When data
is stored on a drive, it often ends up in various parts that aren't all
in the same place. This is called data fragmentation. It slows down HDDs
because the drive's head needs to move from place to place to read all
the little bits of information. This can be fixed using a process called
defragmentation, which is built into recent versions of Windows (7 and
higher) and OS X. Because the location of data on an SSD is pretty much
irrelevant, as it can quickly access any of it regardless of where it
is, defragging a SSD is not only unnecessary but bad for the drive as
well. SSDs have a limited lifespan that's determined by how much they're
used. While most will last as long as you'd ever need, defragmenting
the disk involves reading and writing data unnecessarily and those
actions will shorten your SSD's lifespan. OS X and Windows should know
when you're using an SSD and turn off defragmenation automatically. That
said, it's important to remember not to defragment your solid-state drive. It provides no real benefit and can shorten its life.
For more tricks on getting the most from your SSD, check out our guide to taking full advantage of its speed. Now that you have an SSD, certain things—like Hibernation—are much faster than they once were, and are really worth using.
You should
now be well on your way to a better, faster computer with your
solid-state drive. Most of us here at Lifehacker have been enjoying the
benefits of SSDs for a few years now and can't imagine going back to a
traditional hard drive. Despite the limitations and the cost, they're
one of the best investments you can make. We hope you enjoy your SSD as
much as we're enjoying ours!
Nei giorni scorsi abbiamo visto come è semplice passare Arch Linux da un normale hard disk in una SSD utilizzando l'installer di Arch Linux.
Alcuni lettori ci hanno chiesto se possibile fare tutto questo anche con Ubuntu, copiare l'intera distribuzione in un'altra partizione su SSD e ripristinare il boot correggendo fstab.
Incuriosito ho ripreso il mio nuovo SSD formattato e ho provato a passare al suo interno Ubuntu 12.10 presente nel mio pc desktop "muletto".
Per far tutto questo ho deciso di utilizzare l'installer di Arch Linux
per il semplice fatto che con genfstab ho già fstab corretto e
funzionante senza doverlo riscrivere da nuovo (magari come spesso accade
sbagliando qualche dato).
Passare Ubuntu da un normale hard disk a SSD è molto semplice, ecco come ho fatto:
Per prima cosa dobbiamo collegare SSD al pc mantenendo collegato anche
l'hard disk con Ubuntu e avviamo dal boot l'installer di Arch Linux.
Una volta avviato impostiamo la tastiera italiana digitando:
loadkeys it
fatto questo digitiamo
fdisk -l
per verificare come viene riconosciuto il nuovo SSD dal sistema (nel mio vaso sdc)
fatto questo creiamo una partizione di root e una di swap con cfdisk basta digitare:
cfdisk /dev/sdc
nel mio caso ho creato una partizione da 30 Gb di Root (sdc1) e una da 2 Gb di Swap (sdc2)
una volta create le 2 partizioni dovremo formattarle digitando:
mkfs.ext4 /dev/sdc1 mkswap /dev/sdc2
a questo possiamo copiare Ubuntu nel SSD digitando:
dd if=/dev/sda1 of=/dev/sdc1
al termine dovremo ricreare il fstab e aggiornare il grub altrimenti non
potrà avviarsi per far tutto questo basta montare la nuova partizione
con Ubuntu e la swap:
mount /dev/sdc1 /mnt swapon /dev/sdc2
e generiamo un nuovo Fstab (importante) digitando:
genfstab -U -p /mnt | sed 's/rw,relatime,data=ordered/defaults,relatime/' >> /mnt/etc/fstab
ed entriamo nel nuovo sistema operativo utilizzando Chroot digitando:
arch-chroot /mnt
e aggiorniamo il boot digitando:
update-grub
al termine digitiamo exit e riavviamo.
Al boot accediamo dalla nuova partizione sdc e dovremo avere Ubuntu su SSD veloce e scattante.
Vi presentiamo Aptik semplice e soprattutto utile applicazione che ci
consente di effettuare il backup e ripristinare temi, PPA, applicazioni
e pacchetti in Ubuntu Linux.
Nei repository ufficiali di Ubuntu troviamo diverse applicazioni
dedicate al backup e ripristino di file, directory e dell'intero sistema
operativo, software molto utili che ci consentono di ripristinare il
nostro sistema oppure mantenere al sicuro i nostri dati più importanti.
Da oggi è possibile anche salvare non solo file e cartelle ma anche i
nostri pacchetti, temi, ppa ecc con estrema facilità grazie
all'applicazione Aptik è una nuova applicazione open source sviluppata dal team TeeJee Tech (famoso per lo sviluppo di TimeShift, Selene e Conky Manager) che ci consente di effettuare il backup e ripristino dei nostri PPA, temi icone, software ecc con pochi e semplici click.
Attraverso Aptik potremo salvare tutti o solo alcuni dei nostri PPA e repostiory di terze parti,
salvare tutti i pacchetti degli aggiornamenti ed applicazioni (APT
Cache), effettuare il backup dei pacchetti e dipendenze varie delle
nostre applicazioni, tool, librerie, giochi ecc oppure salvare i nostri
temi e set d'icone preferiti.
Utilizzare Aptik è molto semplice, basta indicare una cartella dove
salvare i file, pacchetti ecc (può essere anche un'hard disk esterno,
pendrive ecc) e scegliere se effettuare il backup dei PPA (compreso
anche le key d'autentificazione), Software, interi pacchetti presenti
nella cache di apt. oppure i temi ed icone preferiti.
Per ripristinare in un secondo momento i PPA, temi, software ecc basta
riavviare l'applicazione indicare la cartella di backup e cliccare su
Restore e confermare il ripristino.
E' possibile operare in Aptik anche da riga di comando,
consentendo cosi la possibilità di effettuare il backup di software,
repository ecc in server o da remoto accedendo alla nostra distribuzione
ad esempio da SSH.
Aptik backup PPA
Aptik backup applicazioni
Aptik backup temi ed icone
Aptik funziona in Ubuntu Linux, anche se non testato dovrebbe funzionare
anche in derivare come Ubuntu Gnome, Xubuntu, Lubuntu, Linux Mint, ecc.
Per installare Aptik in Ubuntu e derivate basta digitare da terminale: